Introduction
FileCatalyst Server
FileCatalyst Server software is deployed wherever files are centrally managed and handles file and user management, security, transfer acceleration (up to 10Gbps), and other features. Since a FileCatalyst Server is the heart all FileCatalyst applications, FileCatalyst deployment can be expanded in any direction with perfect interoperability.
FileCatalyst Server help documentation is available here.
Web Administration
Although FileCatalyst Server is a desktop application, it can be managed remotely either with a Java-based Remote Administration tool or via this web-based tool.
This guide is intended to explain the FileCatalyst Server's Web Administration tool, walking the administrator through the interface in order to show how to configure and use FileCatalyst Server.
User Interface (UI) Overview and Conventions
The interface uses a common “vocabulary” of interactions. A quick look at the application's conventions should allow most administrators to get right into using the product as a whole.
Main Navigation
Administrative and configuration categories are found in the main navigation. When the viewport (ie. browser window) meets a minimum size requirement, this navigation is always visible as a vertical sidebar beside the main content area.

When the viewport is below a certain size threshold, the navigation becomes hidden in an off canvas menu, accessible by clicking the "hamburger" menu widget:

Main Content
As the user navigates the sidebar, the content in the main area changes, exposing the tools related to the navigation item.

Within the main content area are a few additional control types to be aware of:
Sub-navigation
Drill down further into more specific configuration and information options by clicking through the sub-navigation items. In the large view, these appear as tabs:

In the small view, these become "accordion" panels. Clicking one will expand it into view:

Item Tools
Certain views contain tables of data. These tables typically represent lists of editable items, such as lists of users present on the system. At the end of each row is an icon which opens a pop-up menu enabling actions such as editing or deleting the item.

Secondary Tools
In the upper-right corner of the application is a "gear cog" icon with a dropdown menu, which opens to show additional functionality:

Sign Out
Allows the administrator to sign out of the application and clear their credentials from the browser.
Note: It is possible to set FileCatalyst Server to not request credentials for local administration. In this case, the Sign Out button is replaced by a Refresh Session button, which clears the current session and refreshes the page.
Pause UI
Allows the administrator to visually pause updates to the UI. The application will be functioning as usual in the background, but the current view has its state paused. Activities which refresh data (such as sorting, page navigation, and editing individual items) will cause the latest version of the data to appear.
Help
Opens this help document.
Logs
This link opens a new page displaying the FileCatalyst Server logs.
About
This invokes a pop-up dialog with information about installation environment and version.

The dialog contains the Diagnostic Report button, which should only be pressed if requested by the support team, at which time it will create a package of files to be used during troubleshooting. No additional visual feedback is presented to the user after pressing the button.
Understanding Users, Groups, and Virtual Files / Folders
In the "Users" panel are 5 tabs which represent a series of interconnected pieces of information related to users. A user may belong to a group (for example), but a group is created independently from a user. Either groups or individuals may have access to configured virtual files and folders. Let's take a moment to examine how pieces of user data relate to one-another, and then we will explore the interface itself in the subsequent chapter.
User Accounts
FileCatalyst Users live at the application layer, and are managed by our internal database. Unlike standard UNIX FTP servers, you do not need to create a user at the OS level in order to utilize FTP access. If the user also exists on the operating system however, FileCatalyst Server can authenticate the user using external directory services such as Active Directory, LDAP or PAM.
FileCatalyst users by default are jailed to their home directories. This security feature ensures that a user cannot see data which does not belong to them (i.e. cannot see C:\Windows).
User Groups
For larger and more complex configurations, user groups are available. These allow administrators to easily map drive access to organizational roles (example: IT staff needs access to backups), and allow users to be assigned to one or more groups.
When assigning Virtual Files or Folders to either Users or Groups, permissions may also be granted. If multiple paths exist to a file or folder (example: John sees folder "project1" both through "IT" and "development" group), permissions are stacked for each access a user has to that file or folder.
Virtual Files / Folders
Virtual files and folders allow an administrator to create multi-pathed home directories, and give flexibility to allow users access to directories outside their locked user account paths. Virtual Files allow an administrator to give access to specific files outside of the users home directory.
Example: Bob requires access to project files stored in Y:/DEV in addition to files in his home directory. We can create a Virtual Folder called "project1" with a path Y:/DEV/. Once this is done, the Virtual Folder can be assigned to the user, where it will appear as a mounted subdirectory inside his home directory. Note that these labels will be case insensitive on a Windows machine. (i.e. "project1" is the same as "PROJect1")
Multiple virtual files and folders may be assigned to a user, each with assigned permissions.
Permissions
Permissions are assigned at a per-user or per-group level. When a user belongs to one or more groups, the higher permission level has precedence, creating a permissions "merge". For example, a user who does not normally have "Modify Files" belongs to a group that has "Modify Files". The user will now have "Modify Files" as long as they belong to that group.
The available permissions are as follows:
- Download Files: If selected, the user has the ability to download files from the server. Note: Download with Incremental Delta's requires upload permission as part of the RSYNC algorithm (signature files).
- Upload Files: If selected, the user has the ability to upload files to the server. This does not indicate that they can modify or overwrite files if they already exist. Note: Upload with Incremental Delta's requires download permission as part of the RSYNC algorithm (signature files).
- Modify/Overwrite Files: If selected, the user is given permission to upload
files, as well as
modify existing files by overwriting, or performing file operations (chmod, etc).
- Note: Some features require modify/overwrite permissions.
- HTTP upload transfers need this enabled, as HTTP blocks are appended to a file and are considered "modified" rather than an original upload.
- Transfers using auto-resume as an option require modify to be enabled, as resuming a partially transferred file is considered modification of an existing file.
- Delete Files: If selected, the user is able to delete files from the server.
- Rename Files: If enabled, the user is able to rename existing files on the server. Note: Upload transfers with temporary filenames require rename permissions to be enabled.
- List Directories: If enabled, the user is given permission to browse the file system, and get directory and file listings. This is required for all FileCatalyst clients download option to work correctly.
- Create Directories: If selected, the user will be able to create new directories on the server.
- Modify Directories: If selected, the user is given permission to create new directories, and modify existing directories (chmod, etc)
- Delete Directories: If selected, the user is permitted to delete existing directories from the server.
- Rename Directories: If enabled, the user is able to rename existing directories.
Force File Ownership (Upload Only)
By selecting the "Force File Ownership" checkbox, all files transferred to the user will have their operating system user ownership set to the value specified. If the "Use user login" checkbox is selected, the FileCatalyst user's current username will be used instead of the specified value.
Note 1: On Linux, an additional field allows configuring group ownership.
Note 2: Force File Ownership is currently only supported with internal file systems. All external file system transfers will not have their file ownership changed to the configured value.
Note 3: If the Maintain UID/GID system property is enabled, the user and group data will be updated to accept user and group identifiers. Please note that this functionality is only on Linux operating systems.
Test Access Rate

This test is meant to help the administrator understand the read and write capabilities of the storage (for example, a disk array) for the path associated with the user account. The test is measured against the maximum configured bandwidth, set by the Server license. There are three things to look for in the test:
- The block size which achieved best results. This will help inform choices when configuring tasks. There is a final result at the top of the interface, and a series of sorted boxes below showing individual test results.
- The average rate across all tests. This will help the administrator understand the overall performance of the attached storage.
- The access speed relative to the configured line speed. The administrator will be able to see at a glance if their bottleneck is the storage or the line speed. In a well-configured environment, access rate should be faster than line speed.
Click "Start" to begin a series of tests, which will be sorted as results are updated.
Click "Cancel Test" to stop testing and display the current results.
Note: The test creates temporary files on the disk. Ensure that enough space is available for the test.
Users Panel
Select "Users" from the main menu to load this panel into the main content area. The users panel has five sub-navigation tabs, exposing controls related to creating the "interconnected" user data described in the previous section:
- User List
- Groups
- Virtual Files / Folders
- User Defaults
- Login Security
User List
Navigating to the User List tab exposes a table populated with user information:

The table rows show "at a glance" data related to each user, including:
- Username: A unique identifier for the user. The username is used throughout the system for activities such as logging in and user-specific statistics.
- Full Name: Arbitrary text; by convention, a first name and last name combination.
- Home Directory: The path on the server machine where this user's files are stored.
- Enabled/Disabled: Rows highlighted with yellow and with italic text show disabled user accounts.
- Blocked: The rows highlighted with red and with italic text show blocked user accounts.
Adding a User
Click the "New User" button above the table to invoke the "Add a new user" modal dialog:

Username, New Password and Confirm Password are required fields. However, if blank passwords are allowed, only the Username field is required.
After completing the form, click "Create User" to finalize adding a new user. To cancel creating a new user, click the "X" (close) icon in the upper right corner of the dialog.
Unblocking a User
When a user is blocked, that user's tool menu will show an "Unblock" action. Clicking on this action will unblock that user.
Deleting a User
Open an individual user's pop-up menu by clicking the icon in the right of the user's table row. Then select "delete". Upon successful deletion, the table will refresh with the user no longer present.
Connecting a User
Open an individual tab or window on the browser and load TransferAgent Express, connecting the selected user account to FileCatalyst TransferAgent.
TransferAgent Express is an application that uses FileCatalyst TransferAgent to execute transfers between a local machine and a FileCatalyst Server.
More information about TransferAgent Express can be found in the FileCatalyst TransferAgent documentation.
Note: Your browser may block these kinds of “popups”; if pressing the button does not show a new tab, please check your browser settings and pop-up blocker add-ons.
Editing a User
Open the user's pop-up menu by clicking the icon in the right of the user row. Then select "edit". This will invoke a modal dialog overlay containing tabbed sub-sections: General, Security, Groups & Folders, and Bandwidth / Quota. After making changes to any settings, click "Apply" to save the changes to the FileCatalyst Server.
The General tab contains most of the options available when adding a new user:

- Account Enabled: Toggle this checkbox to enable or disable an account.
- Full Name: Strictly speaking, this field contains arbitrary text. By convention, administrators typically use it to store a user's real first name and last name.
- Email: The email address is optional, but is used for activities involving notifications as well as for FileCatalyst WebLink functionality. Email address must be properly formatted.
- Home Directory: The home directory of the user is the root directory to
which they will have access.
For example, if the user's home directory is specified as C:\Users\MyUsername\, they can access the
MyUsername folder,
and anything below it (e.g. C:\Users\MyUsername\MyNewDirectory).
It is possible to select a path on an external file system. Selecting Manual or Local Files and supplying an external path that contains access credentials may result in limited browsing functionality. - Account Expiry: Accounts may be set to expire, at which time they become "disabled". Click the button to the right of the input field in order to invoke a date picker. The date picker itself has an additional "time" icon which may be clicked for fine-tuning to the minute. To modify an account to never expire, simply click into the input field and delete its contents.
- Test Access Rate: Opens a new dialog to request a series of read/write operations to the user's home directory as described in the Test Access Rate section.
- Force File Ownership: Enable/disable force file ownership on files download by the user as described in the Force File Ownership section.
The Security tab relates mainly to permissions, but also contains the ability to update the user's password:

- Change Password: Pressing this button will launch a separate dialog asking the administrator to provide a new password and a password confirmation. The password is updated from this separate dialog; there is no need to also press "Apply" on the Security panel itself.
- Permissions: Toggle checkboxes or click on the shortcut buttons described
below to
give/rescind permissions for this user, at both file and folder levels, clicking
"Apply" after all changes are made. Permissions details are described elsewhere in this document.
- Select All : Shortcut that selects all permission for the user for both files and folders.
- Read Only: Shortcut that selects only File Download and Folder List permissions.
- Write Only: Shortcut that selects permissions normally required for a user which only needs to upload files to the server.
- Clear: Removes all permissions to the user.
The Groups & Files / Folders tab allows the user to be assigned to one or more user groups, and one or more virtual files/folders. Instructions in the dialog itself show how to move groups and folders between "Available" and "Currently Assigned". Any items appearing in "Currently Assigned" are available to the user being edited.
It is also possible to reassign user permissions for individual virtual folders. (Note: For virtual files, read-only permission is always assigned.) Virtual folder permissions can be set to one of Read-only, Read-write or Advanced. If advanced is selected a secondary dialog will pop up allowing additional options. Permissions details are described elsewhere in this document.
Click "Apply" after making any changes.

The Bandwidth / Quota tab allows administrators to restrict bandwidth usage at the account level:

- Priority: This setting determines how much bandwidth will be allocated to
a
connected user in proportion to other connected users.
The possible settings are High, Medium, and Low. The weight of each priority is 10, 5, and 1
respectively.
The combined weights of all connected users are added together, and divided into the total available
bandwidth of the server.
The result is then multiplied by the weight of the user to determine the actual allocated bandwidth.
For instance, if there is a high priority user and a low priority user connected, and the server is
licensed for 100 Mbps,
then the total priority is 11. Divided into 100000, this gives 9090.09 kbps. This means the low
priority
user will get 9.09 Mbps,
and the high priority user will get 90.91 Mbps.
If only one user is connected, they will be allocated all available bandwidth. - Impose Bandwidth Limit: Toggle whether or not the defined bandwidth limit is being used
- Bandwidth Limit: This setting determines the maximum bandwidth for a
particular user, regardless of what is allocated to them via the
priority settings. This is useful if the available bandwidth of the end user is known to be a
particular
value.
This ensures that all UDP transfers will never exceed that value. Although the end user also has the
option to
specify the maximum bandwidth on the client side, this might be easier.
If the calculated bandwidth based on priority is higher than the maximum value specified in this setting, the difference will be re-allocated to all other connected users.
This setting helps maintain fairness and still make optimal use of available bandwidth.
Note on slower bandwidth settings (most noticeable below 100kbps) it may be necessary to lower the packet size of the udp transfers to get a tighter control over the limit due to the granularity effect packet size has on bandwidth throttling. - Impose Bandwidth Quota: Toggle whether or not the defined bandwidth quota is being used
- Daily Bandwidth Quota (Upload only): This setting ensures that a user cannot upload more than the specified value in KB on a given day. A day is determined by the date settings on the server machine. Note that this is not a disk usage quota, but a fair usage quota. A user who has exceeded their quota is not necessarily blocked from transferring; however priority is always given to users with daily quota remaining.
Groups
Navigating to the Groups tab exposes a table populated with group information:

The table rows show "at a glance" data related to each group, including:
- Group Name: A unique name given to the group. Administrators will ideally create meaningful names, as this name is sometimes used without an accompanying description.
- Description: Long-form text description of the purpose of the group.
- User List: A list of users who belong to the group.
- Files/Folders: A list of virtual files and folders that are available to this group's users.
- Assigned/Unassigned: A group's row that is highlighted with a grey background and italicized text indicates that the group is not assigned to any user.
- Enabled/Disabled: Rows highlighted in yellow, with italic text show disabled groups.
Adding a Group
Creating a new group only requires a name and a description. Click the "New Group" button above the table and complete the form in the modal dialog that appears. After completing the form, click "Create Group" to complete group creation. To cancel, click the "X" (close) icon in the upper right corner of the dialog.
Deleting a Group
Open an individual group's pop-up menu by clicking the icon in the right of the group's table row. Then select "delete". Upon successful deletion, the table will refresh with the group no longer present.
Editing a Group
Open an individual group's pop-up menu by clicking the icon in the right of the group's table row. Then select "edit", which will invoke the Edit Group modal dialog. In addition to updating the Name and Description of a group, administrators are also able to toggle whether or not the group is Enabled.
Virtual Files / Folders
Navigating to the Virtual Files / Folders tab exposes a table populated with information on virtual folders and files:

The table rows show "at a glance" data related to each virtual file/folder, including:
- Label: A unique name given to the virtual file or folder.
- Description: Long-form text description of the purpose or additional information about the file or folder.
- Assigned Users: A list of users who have access to the file or folder.
- Assigned Groups: A list of groups with shared access to the file or folder.
- Assigned/Unassigned: A virtual folder that is not assigned to any user or group will be highlighted in grey with italicized text.
Adding a Virtual File or Folder
Upon clicking the "+ New" button, a modal dialog containing a short form appears:

Label
This represents the sub-directory or file name a user will see in their home directory when logging into the system.
Description
Description of the file or folder. Useful for administrators to recognize the purpose of the virtual file or folder.
Path
Physical disk location on the server where this virtual file or folder is pointing. When the option "Local Files" is selected, this can be a local file or a full UNC path (e.g. "\\10.1.1.1\dir\"). When an external file system is selected, the path must contain the address to access the file or folder. Selecting Manual or Local Files and supplying an external path that contains access credentials may result in limited browsing functionality.
After completing the form, click "Create Virtual File or Folder" to complete creating the file or folder. To cancel, click the "X" (close) icon in the upper right corner of the dialog
Deleting a Virtual File or Folder
Open an individual item's pop-up menu by clicking the icon in the right of its table row. Then select "delete". Upon successful deletion, the table will refresh with the virtual file or folder no longer present.
Editing a Virtual File or Folder
The options are identical to "Adding a Virtual File or Folder" shown above, with the exception that the "Apply" button takes the place of the "Create Virtual File or Folder" button.
User Defaults
User Defaults allows the administrator to pre-define what configuration values a new user should have by default when created. These are a subset of the options presented when editing a user account, divided into the following sections:
- Account Settings: Enable/disable new accounts by default, determine a root path (new accounts will use a folder within that path), and set a default expiry for new accounts.
- Force File Ownership: Enable/disable new accounts to force file ownership on downloaded files as described in the Force File Ownership section.
- Permissions: A set of default permissions, as described in the Permissions section.
- Bandwidth / Quota: Default quotas and limits, as described in the Edit User section.
Login Security

FileCatalyst Server can be configured to block user accounts and/or IP addresses which have been identified as having multiple consecutive failed login attempts. When the limit is reached, login failures are recorded in the application log files. If FileCatalyst Central is configured, alarms are also sent out notifying that a User account or IP address has had multiple consecutive login failures.
User Accounts
Failures are considered to be at the account level (based on incorrect credentials) and result in blocked accounts. Once user accounts have been blocked, they are highlighted and italicized in the User List. To re-enable, edit the user and toggle the "account enabled" checkbox.
- Allow blank passwords: with this option enabled, users may be created with no password, and users logging in with such accounts may leave the password field blank.
- Enable login blocking: with login blocking enabled, FileCatalyst Server can prevent brute-force attacks. Once enabled, the "Consecutive login failure limit" and "Time to block login" fields become available. With login blocking disabled, those fields are ignored.
- Consecutive login failure limit: this field determines how many consecutive authorization failures must occur before an account is disabled.
- Time to block login (seconds): once the consecutive failure limit is reached, the account may be disabled temporarily by setting a value in seconds, or permanently by setting a value of zero (0).
IP addresses
Failures are considered to be at the IP level (though still based on incorrect credentials) and result in blacklisted IPs, with the account itself remaining enabled.
- Consecutive IP Failure Limit: this field determines how many consecutive failures from a single IP must occur before attempts from that IP are blocked.
- Block IP: with this option enabled, once the failure limit is reached, the IP becomes blocked.
- Time to block IP (seconds): once the consecutive IP failure limit is reached, the IP may be blocked temporarily by setting a value in seconds, or permanently by setting a value of zero (0).
Advanced Panel
This panel contains settings that go beyond daily usage. Currently there are six sub-section tabs available: Network Information, Memory, UDP, Miscellaneous, License and System Properties
Network Information

- Server Hostname/IP: FileCatalyst Server can bind server port to specific IP
addresses hosted by the machine. By default,
the server will try to bind to port 21 at 127.0.0.1.
Note: In some situations the server will try and bind to an IP address that has not yet been initialized by the server. If you are experiencing this problem, you can add a bind timeout to allow more time to establish a bind. To add this value, you must add the following new line to system properties:
Property Name:FCServer.server.config.bind.timeout, Property Value= TIME
Replace "TIME" with the number of millisecond you wish to wait to establish a bind. The default is 30000. - Server Port:The port on which the server is listening for incoming connections. Clients connecting into this port should be aware that the data (including user/password) are non-encrypted, and can be intercepted on the network. This is maintained mostly for backwards compatibility with standard FTP. Default 21.
- Secure Server Port: FTPS port, where connection data is encrypted using SSL. Default port 990. By default, a self-signed SSL certificate will be created at run-time by the application.
- Data Port Range: The port range which the server can use for data connections.
- Idle Timeout: The amount of time (in seconds) to remain idle before automatically disconnecting a client. This value defaults to 300 seconds or 5 minutes. Note that in some cases the client may be executing long running processes such as an MD5 or delta calculation on very large files and thus it may be necessary to increase this value.
- IP Masquerade Address: When FileCatalyst server is running on a private IP address, behind a NAT device, you must specify the public IP of the NAT device in order for FileCatalyst to allow connections from outside the NAT.
- Bypass IP Masquerade for local: By default, the IP masquerade applies to all connections. However, it may be desirable to bypass the masquerade address for local connections. A local connection is considered one whose IP address is within the 192.168.*.*, 172.16-31.*.*, or 10.*.*.* ranges.
Memory

- Maximum Block Size: The maximum block size dictates to all clients uploading files what the maximum block size will be. The block size determines how much data will be stored and sent at one time from the transmitter to the receiver. For example, if the block size is 10MB (10240000 bytes) then 10MB of data will be sent before proceeding to the next 10MB of data. Generally the larger the block size the better the throughput due to less acknowledgments. A server with a larger amount of memory may have a larger maximum block size. Consideration should be given to how many concurrent transfers may be occurring at one time as the memory usage of the server may rise to the product of the maximum block size X the maximum sender threads X the number of concurrent connections.
- Maximum Packet Size: The maximum UDP packet size that client applications can send to the server. Generally this should be less than the MTU of your network, usually 1500.
- Maximum Sender Threads: In order to improve performance, FileCatalyst transmit clients can begin to send another block of data before the previous block has been acknowledged. This setting defines how many blocks can be started before waiting for all previous blocks to be acknowledged. This improves performance as it removes the down time between when the transmitter has sent an entire block and when the receiver has acknowledged the receipt of that block. The memory consumption on the server and the client will necessarily consume more memory the higher this value is set. The amount of memory will be the product of the number of threads and the block size. Since the overlap time can be quite small, sometimes only 0.5 seconds or lower, the memory usage may appear to increase then drop once the previous block has been acknowledged.
- Concurrent Connection Limit: When enabled, the server can set a maximum concurrent user limit below the value
granted in the license.
As a general rule, very high latency and high bandwidth network conditions often see performance improvements by having higher number of sender threads or allocating larger block size each thread. With limited memory on a system and a large volume of concurrent users connecting, you can encounter situations where the Java Virtual Machine runs out of memory, and cannot accept new connections.
If this scenario is encountered, the solution can either decrease memory allocation each user consumes server-side (the button ‘Configure for High Server Load’ does this), or limit the number of concurrent users while maintaining high throughput links within available memory.
UDP Resources

When configuring the FileCatalyst server to achieve high speed levels (500Mbps - 10Gbps for a single connection), several optimizations must be done in order to make sure the system is able to utilize multiple cores of a server. These include configuring the number of reader threads per connection, packet processors (used for decoding AES packets on the receiver side), and the number of block writers.
- # Reader threads: Number of threads PER CONNECTION spawned to read blocks off the disk and place them into the sender queue ready for transport. On the server, setting this value will only affect downloads. Most systems perform optimally when you configure only 1 thread to perform reading. There are two scenarios where this value should be moved up: when IO tests have shown that adding threads increases throughput for your storage device, or when utilizing high CPU load (more sender threads than CPU cores, or utilizing high CPU options such as AES encryption or LMZA compression), a single thread doing the block reads may be pushed down in priority and be CPU starved, causing a slowdown in transfer speeds. Multiple threads may help both of these scenarios. If your system is configured to accept 50+ concurrent connections, it is recommended to leave this value at the default settings (1) to minimize system resources.
- Reader block size: By default, the block size used for each read operation is the same size specified by the client in the network block size. This can be adjusted for improved performance. Please run the advanced IO testing tool to see what works best for your system.
- Packet processors: Packet processors are responsible for taking packets off the network socket, decrypting
them, and preparing them for
the block writers. When using AES at speeds greater than 200Mbps, it may be required to
increase the number of packet
processors on the receiving end to ensure multiple CPU's are utilized to decrypt the
incoming data.
On the server, setting this value will only affect uploads. If downloading data from the server, similar settings should be set on the client applications. - # of Writer threads: Number of threads PER CONNECTION spawned to write blocks off the disk. On the
server, setting this
value will only affect uploads. Writer threads in FileCatalyst perform the following
tasks:
- Uncompress data block (if using on-the-fly compression)
- Perform MD5 checksum on block (if using on-the-fly Verification)
- Write block data to disk
For systems using LMZA compression or possibly high speed transfers (> 1Gbps), setting multiple block writers may allow higher performance for single high speed connections. If your system is configured to accept 50+ concurrent connections, it is recommended to leave this value at the default settings (1) to minimize system resources. - Writer block size: By default, the block size used for each write operation is the same size specified by
the client in the network
block size. This can be adjusted for improved performance. Please run the
advanced
IO testing tool
to see what works best for your system.
These values should be modified only after running through some performance IO testing. See here for more details.
Miscellaneous

Bandwidth
- Unlimited bandwidth for FTP LAN Transfers: By default, LAN FTP connections are granted unlimited bandwidth to the server. This behavior can be disabled, restricting even non-latent FTP traffic to abide by the server license restriction.
- Enable Bandwidth Limit: In some cases, it may be beneficial to impose a bandwidth limit on the FileCatalyst Server. To enable a global bandwidth limit, select the Limit maximum bandwidth option, and then specify the limit that you wish to have. Do note, that this limit cannot be negative, and cannot exceed the bandwidth limit on the current FileCatalyst Server license.
System Monitor
Toggles the FileCatalyst Server to allow File System Event Monitoring, a feature provided with the HotFolder to trigger notifications when the file system detects a change event on a user directory. If errors are occurring because the file system is not compatible (some mounted network file systems), you can disable the feature to prevent error messages from appearing in the logs.
Rotation Time
This setting allows you to rotate logs and reset quotas at a time other than midnight. This is useful in situations where your server is located in a different time zone than most of your clients. i.e. you could have the quotas reset at midnight for your clients, rather than midnight on your server.
File Post Processing
The server will attempt to execute the given script after each file upload is complete passing in the following parameters into the said script. <%U%> will be replaced with the user receiving the transfer. <%F%> will be replaced with the absolute path to the uploaded file. If <%F%> is not found, the server will append the absolute path. <%A%> will be replaced with either UPLOAD or DOWNLOAD.
For example: /scripts/postProcess.sh <%F%>
Note: currently this feature is disabled for archiving since it defeats the purpose of batching large groups of small files together only to send a post command to the server for each individual file transferred, incurring the overhead that auto zipping (and Auto Archiving in multi manager) hoped to avoid.
Sample Scripts
Windows sample, to go into a .bat file. This script simply reads the parameters and saves the values to a post_process.log file
echo %1 %2 %3 >> C:\Program Files\FileCatalyst Server\post_process.log
Unix sample, to go into a .sh file. This script simply reads the parameters and saves the values to a post_process.log file
echo $1 $2 $3 >> /home/adminuser/post_process.log
Server Optimizations
Disable Force Flush
By default, write operations automatically flush both data and meta data to file system for all IO calls. Disabling force flush allows Java to utilizes the OS file cache (RAM)..
License

- Product Version: Current product version.
- Request String: This string is provided by the product itself. The account representative will need this string in order to generate a working license key for your FileCatalyst Server instance.
- License Key: Once you have been issued a license key, copy and paste it (ensuring you are not pasting any space characters at the beginning or end of the string) and press the "Apply" button.
- Expires: The date when you license expires.
- Bandwidth: Maximum transfer speed allowed by FileCatalyst Server. This is determined by your license.
- Max # Connections: Maximum simultaneous connections allowed by FileCatalyst Server. This is determined by your license.
- License Type: The type of license (eg., "FileCatalyst Enterprise License" or "FileCatalyst Demo License").
- Product Features: Once a license has been successfully applied, a list of available features will appear in this area.
System Properties

This advanced feature is a tool for tech support to change Java VM System Settings on the fly, do not change any settings here without help from tech support. System properties are case sensitive. Please contact support before attempting to use these features.
To add a new system property, click the "New System Property" button. A pair of fields will appear, representing the key (or "name") and the "value" of the new system property. Click the check-mark button to finish adding the new system property.
Press the discard icon next to existing property value fields in order to remove it.
IP Filters
IP Filters provide a method of protecting your server from attacks or malicious users. Servers can be pre configured to allow or deny all IPs by default, and then provide exceptions to the default rules. If Allow is enabled, any IP's on the allow list will take precedence over the Denied list. If Deny is enabled, items in the deny list take precedence over the allow list.
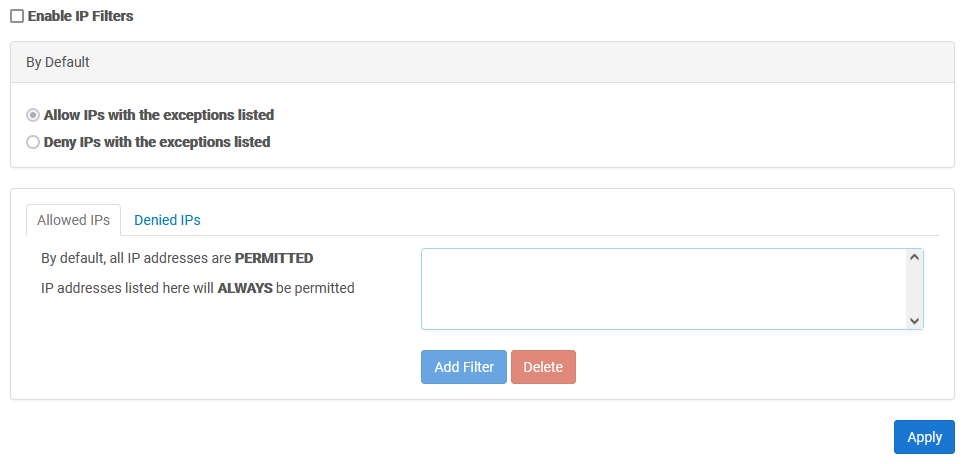
Enable IP Filters
To enable IP filters, this box must be checked. If left unchecked, any filters applied (including the default apply/deny rule) will be ignored and all requests will be allowed.
Allowed IP List
The allowed IP list indicates the IP's that should always be allowed access to the server, regardless of the default mode. In the case that an IP is found in both the Allowed AND Deny Lists, the rules of precedence described above will take place.
Denied IP List
The denied IP list indicates the IP's that should always be denied access to the server, regardless of the default mode. In the case that an IP is found in both the Allowed AND Deny Lists, the rules of precedence described above will take place.
IP Ranges and Wildcards
IP rules support both wildcards and ranges. For example:
- 192.168.1.1 (only this specific IP should be affected by the rule)
- 192.168.1-100.1 (all IPs starting with 192.168, followed by any value within the range of 1-100, followed by a 1 should be affected by this rule)
- 192.168.*.* (any IP starting with 192.168 should be affected by this rule)
IP Filters XML Schema
The IP Filters XML file (ipfilters.xml) describes the status (enabled/disabled) of the IP Filters mechanism, as well as the default rule (allow/deny) and any other rules defined.
<?xml version="1.0" encoding="UTF-8"?>

<!-- Root Element in the XML Representing The Access Restrictions
and their current status (enabled=true/false) -->
<AccessRestrictions Enabled="true">

<!-- Denotes the value of the default rule (Allow/Deny) -->
<DefaultRule AllowDeny="Allow"/>

<!-- Denotes the start of the rules for this server -->
<Rules>

<!-- Rules describing specific IPs or ranges that are always permitted to access the server -->
<Allow IP="127.0.0.1" />
<Allow IP="192.168.*.*" />

<!-- Rules describing specific IPs or ranges that are always denied from access the server -->
<Deny IP="147.1-100.*.*" />

</Rules>

</AccessRestrictions>
Security Panel
This panel allows you to configure encryption settings as well as upload certificates

Upload

You may browse one at a time to your certificate file and private key files. Before clicking "Upload", you must also supply the correct password, which the FileCatalyst Server will use to check validity of the certificate and key file pair.
View

You may view the stored certificate and its details by clicking "View" from the main panel. A number of details are available on both the "General" and "Details" tabs.
Email Panel
This panel contains settings to configure FileCatalyst Server to send email notifications

SMTP Settings
- Admin Email: The email address which will be considered the "administrator" email address for the purposes of email notifications.
- SMTP Server: The hostname of your outgoing mail (SMTP) server.
- Port: The port which the SMTP server is running on. Typically port 25 for standard or 465 for secure servers.
- Enable Authentication: If your SMTP server requires authentication, check this box and complete the username and password fields.
- Username: If your server requires authentication to send mail, then enter the username provided by your system administrator.
- Password: If your server requires authentication to send mail, then enter the password provided by your system administrator.
- Use SSL: If your server requires SSL to send mail, then check this box.
With all fields configured, you may press the "Test Settings" button in order to check if FileCatalyst Server is able to successfully request an email to be sent from the SMTP Server. The test does not check for delivery; only for successful authorization and send attempt.
Email Alerts
- Enable Email Alerts: If this is enabled and the user specifies from the client application to send alerts, an email will be sent to the address provided. Note that some SMTP servers have rules in place that may limit the recipient email address to a certain domain name. If you encounter issues configuring these settings please contact the administrator of your SMTP server.
- Email Subject: Enter the subject that you would like all email alerts to have. The default subject for alert emails is "FileCatalyst Transfer Notification"
- Send emails 'From' Admin email: This option determines who will receive email alerts once a transfer has finished. If this option is unchecked, all email alerts will sent to the email address specified within the Admin email text area. If the option is checked, all email alerts will be sent from the specified admin email to the client's email address
Administration Settings
Configuration

Connection Port
Specifies the port which the remote administration tool will use to connect to the FileCatalyst Server (default: 12400).
Enable Remote Connections
Specifies whether or not to allow computers other than “localhost” to connect to the FileCatalyst Server. This value cannot be set until a username has been specified and password has been set for the Remote Admin. Enabling Remote Connections will set the passwords their default values: "system" for the Admin and "rsystem" for the Read Only Admin. Disabling Remote Connections will clear any set passwords.
Enable HTTP Remote Administration
Specifies whether or not to allow computers other than “localhost” to connect to the FileCatalyst Server through HTTP connections. If disabled, all non-local HTTP connections and REST services to the FileCatalyst Server will be rejected.
Force authentication for localhost
Specifies whether or not to force localhost administration connections to authenticate (adminuser/password), or to allow connections through as they already have physical access to the machine.
Expected behavior on a Windows machine is to set this value to false. It implies that when you start the server, the administration console will come up as expected and you can immediately configure and monitor the FileCatalyst Server.
On a Linux/UNIX environment however, client-side remote access is often granted onto a server via SSH or VNC. In order to lock down configuration from regular users, it is desirable to select this feature and limit access.
Read-Only Administrator Account
Provides an optional administrator account that is used only to monitor the server but not apply any settings. When this user connects, all configuration options are hidden, while all activity and monitoring tools are available.
Connections
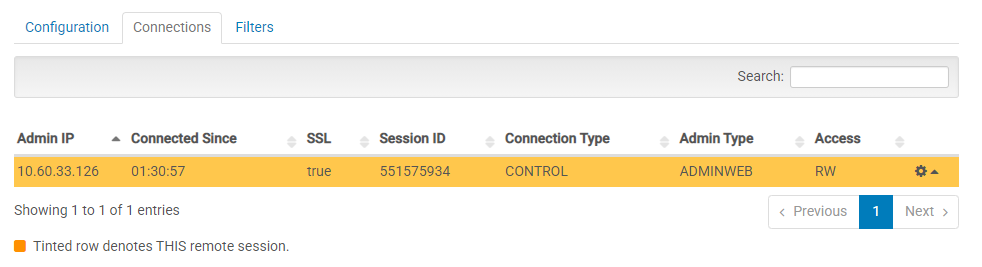
The “Connections” tab allows you to see the connections into the FileCatalyst Server from remote administration tools such as the Remote Server Admin, Remote Server Web Admin, or Server API.
The ‘Connection Type’ column shows that each connection is one of:
- ‘CONTROL’ connections sent commands to the server
- ‘STATUS’ connections retrieve user and admin status updates from the server
- ‘LOG’ connections retrieve administrative log output from the server
Clicking the "gear cog" icon permits closing remote admin connections. Remote admin connections (such as the Server GUI) may reconnect.
Administration Filters

FileCatalyst Server has the ability filter IPs for remote administration connections. This works similar to the User IP Filters, which allow you to designate a default behavior (i.e. DENY all connections) and then apply a filter to allow specific IP addresses or ranges that are allowed access.
Administrators trying to connect from a blocked IP address will be notified they have been blocked by IP Filters.
Link
Overview
In an attempt to allow FileCatalyst clients a simple and easy method to send files to others,
FileCatalyst
provides
clients with the ability create an email "link" that is sent out to a recipient list specified
when the link is created. Upon receiving the link, the recipient will be able to open the email and
activate
the link by clicking on the URL
specified within the email's content. Once a link is activated, a temporary user with no assigned home
directory will be created on the server,
and the recipient of the weblink will use this temporary user to access the files that are contained
within
the link. Temporary users created this way will automatically
delete after the period of inactivity set by you in link settings.
Note: If IP Masquerade is enabled, all Links that are sent out by FileCatalyst Server will have their access IP replaced with the current masquerade address. If both the IP Masquerade and Use Host Name For Links options are enabled, the hostname will be used over the IP Masquerade address
Additional documentation can be found at the following locations:
- Link User Guide contains basic overview on how to use the software to create and download a link.
Link Management

The link management tab allows you see all of the links that are currently stored within the server application. In addition, the table provided will allow you to view important information such as the link ID, which user created the link, how many times the link has been accessed by a client, the creation date of the link and the date the link expires on.
Note: When using FileCatalyst TransferAgent to download a Link, the "Link State" will be set to "COMPLETED" upon both full and partial downloads of the Link. When using HTTP Download, the state will only be set to "COMPLETED" when all files have been downloaded.
By clicking the icon in the right of the link table, the options to edit, delete or resend a Link are presented. When the option “edit” is selected, a pop-up dialog is invoked, containing the field reponsible for changing the expiration date of the selected Link.
Link Creation Settings

Allow Clients To Set Link Expiration Options
Enable this option to give client applications the ability to set an expiration time on links. When a client specifies an expiry, the time must be smaller than the value found within the "Number of days that links will be stored" configuration option.
Delete Links After First Successful Download
Enable this option to cause the Server to delete Links after they are successfully downloaded.
Note 1: This setting applies to all current Links for as long this option is enabled
Note 2: A Link is considered to be downloaded when all files in the Link have been downloaded. If one or more of the files in a Link aren't downloaded, and the "Delete Links After First Successful Download" option is selected, the Link will delete/expire as normal.
Note 3: This setting takes precedence over "Allow Clients To Set Link Expiration Options". If both settings are enabled, a client application may only create single-use Links, but is still allowed to set a custom expiry date as per the description for "Allow Clients To Set Link Expiration Options" above.
Number Of Days That Links Will Be Stored
The number of days that a created link will stored. By default the amount of days that links are stored within the server is 7. However you may change this value to any value that is between 1 day and 31 days.
Number Of Days For Failed Emails Will Be Stored
The number of days a failed email will be stored for retry. The default failed email retention value is 2 days; however, you may change this value to any value between 1 and 5 days.
Number Of Minutes That Pass Before Inactive Temporary Users Are Removed
The number of minutes an inactive temporary user will be stored within the server. The default value is 20 minutes; however, you may change this value to any value between 1 and 60 minutes.
Use Host Name For Links
Hostname may be used instead of IP to give links a friendlier appearance, as well as to allow both internal and external users to access the application. If you wish to use a hostname instead of IP, check this box and specify a hostname in the provided field (ie. somemachine.yourdomain.com instead of default IP value).
Note: To function properly, the hostname must be able to be resolved by the recipients of the links. This is typically done through appropriate DNS entries, but may also be accomplished by the user editing their system (ie. a "hosts" file).
Enable Service Image
Enable this option and provide a valid image file (JPG, PNG, or GIF) in order to show the image in Link emails, as well as on the Link Creation and Link Download pages. In Link emails, the image is shown at the top of the email content; on the Link pages it appears at the top-left corner of the page.
Note: Updating these settings will not affect emails that have already been sent.
Note 2: On the Link Creation and Link Download pages the logo is vertically limited by the height of the navigation bar and horizontally by 125px.
Reporting
Overview
FileCatalyst provides well defined Data and Bandwidth CSV files that may be used by 3rd party applications to generate reports for specific users over defined periods of time. The Data file will contain a record for every individual file transfer that takes place including uploads and downloads.
The Bandwidth file will contain records that include transmit and receive rate as well as username and a time stamp. The frequency of these records is determined by adjusting the report snapshot interval. If there are no active transfers at the time of the snapshot, there will be no record written. If there is data in the snapshot, a record will be written for each individual user that is currently transferring, as well as a record that is the sum of all transmit and receive rates for all users.
Settings
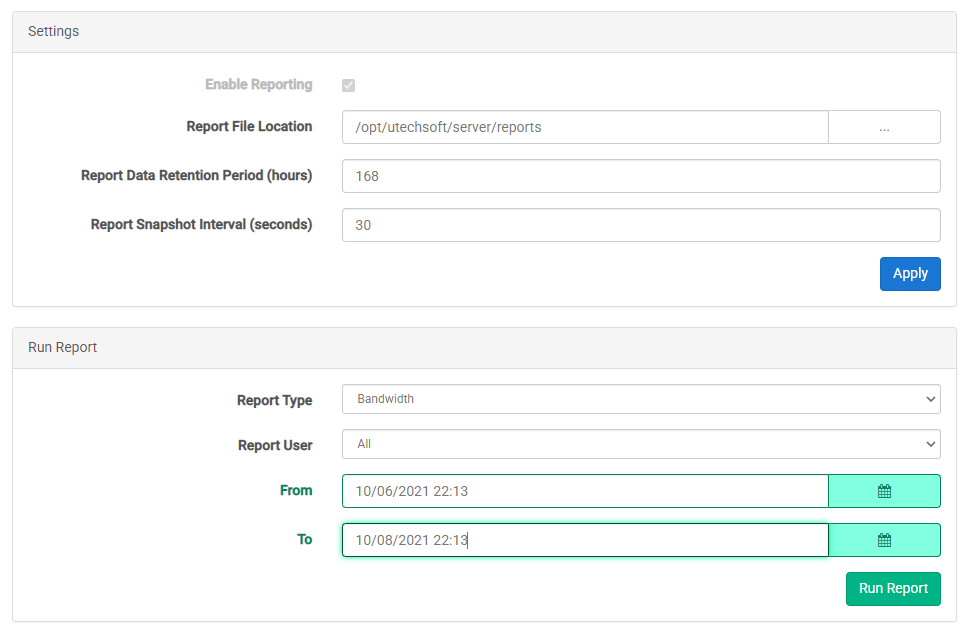
Click the checkbox to enable reporting and press Apply. Define the location for reports in the first field, followed by the Retention Period and the Snapshot interval. The Retention Period is used to define how long logs are kept for before they are purged. Report Snapshot Interval refers to the granularity of the bandwidth data information being captured. Shorter intervals provide the most information, but at the cost of system performance and report file size.
Run Report
Select a type of report, a range of users, and a range of time. Click "Run Report" to generate the files.
Report File Format
FileCatalyst report files are currently written using a CSV (Comma-separated values) file format. The first line of the file will always contain the headers for each field. The format for both the Data report and the Bandwidth report are as follows.
Data Report Information
| Fields | Values |
|---|---|
| Report Create Time | A positive 64-bit integer value representing milliseconds since 1970 |
| Username | The username for account that initiated the transfer |
| Transfer Type | ‘UDP’, ‘FTP’ representing the protocol used for the transfer |
| Direction | ‘UPLOAD’, ‘UPLOAD_RESUME’, ‘DOWNLOAD’, ‘DOWNLOAD_RESUME’ representing direction of transfer |
| ID | 32-bit integer, can be negative but will always be unique across all records. |
| Status | ‘SUCCESS’, ‘CANCEL’, ‘ERROR’ representing the state of the transfer upon completion |
| File Size | A positive 64-bit integer value representing the total size of the source file to be transferred |
| Data Transferred | A positive 64-bit integer value representing the amount of data actually transferred (less than total if cancelled or error) |
| Transfer Start time | Date/Time of transfer start in format yyyy/MM/dd HH:mm:ss.SSS (i.e. 2008/07/30 16:09:10.037) |
| Transfer stop time | Date/Time of transfer stop in format yyyy/MM/dd HH:mm:ss.SSS (i.e. 2008/07/30 16:09:10.037) |
| Average Rate | A positive 32-bit floating point value representing the average data transmit/receive rate (Kbps)for the duration of the transfer |
| Peak Rate | A positive 32-bit floating point value representing the peak data transmit/receive rate (Kbps) over the duration of the transfer |
| Effective Rate | A positive 32-bit floating point value representing the effective data transmit/receive rate (Kbps) over the duration of the transfer |
| Packet Loss % | A positive 32-bit floating point value representing the packet loss percentage over the duration of the transfer |
| Remote Host | The IP address of the remote client which initiated this transfer |
| File Path | The local path which the file was transmitted or received |
| Session ID | A value created in a transfer with a FileCatalyst HotFolder which identifies which transfer task a particular file transfer is associated with |
| Agent ID | The identification value assigned to the server by File Catalyst Central |
| Location | The FileCatalyst Server's IP Address |
| Remote Location | The IP Address of the remote client |
| Report Archive Time | A positive 64-bit integer value representing milliseconds since 1970 |
Sample CSV file contents:
"1217536998271","user","UDP","DOWNLOAD","1162920586","SUCCESS","221184000","217088000","2008/07/31
              16:43:18.271","2008/07/31
              16:43:55.990","47532.0","49916.0","46584.0","0.0","127.0.0.1","C:\data\user\bigfiles\sub\500MB",
              ,"1331613959626-11-NULL","1323899227284","192.168.1.107","192.168.1.147","1506630436501"
Bandwidth Report Information
| Fields | Values |
|---|---|
| TimeStamp | A positive 64-bit integer value representing milliseconds since 1970 |
| Username | The username for account that initiated the transfer. The global sum user is ‘_SUM_’ |
| Remote Host | The IP address of the remote client which initiated this transfer. Value will be blank for the global sum user. |
| Report Time | Date/Time of this bandwidth snap shop in format yyyy/MM/dd HH:mm:ss.SSS (i.e. 2008/07/30 16:09:10.037) |
| Transmit Rate | A positive 32-bit floating point value representing the transmit rate (Kbps) at time of snapshot |
| Receive Rate | A positive 32-bit floating point value representing the receive rate (Kbps) at time of snapshot |
Sample CSV file contents:
"1217350587500","user","127.0.0.1","2008/07/29
              12:56:27.500","0","85000"
Central Management Panel
This panel provides configuration options which allow the FileCatalyst Server to connect to FileCatalyst Central (formerly known as MonitoringAgent or MonitoringConsole) for remote inspection and control.

Check the "Enable remote monitoring" option at the top of the panel, then complete the configuration in the following two panels:
Central
The details of the instance of Central are provided here, which ultimately allow the Server to establish the connection.
- Address: Hostname or IP of the remote Central instance
- Port: Connection port used by Central
- User: A username used by Central to permit incoming connections.
- Password: Paired with the username, a credential which Central uses to permit incoming connections.
Server
The details of this instance of Server are supplied here. Since Servers can respond to connections on various IPs, be sure to select the one that will allow an external application (Central) to have a line of communication to the Server. In other words, it should be an external IP resolving to this Server.
- IP: From the list of available IPs, the one which Central will be able to use to establish a connection.
- Hostname: A read-only view of which IP is being broadcast by FileCatalyst Server (usually via the IP Masquerade option).
- Alias: A unique name which will make this Server easy to recognize within FileCatalyst Central.
External File Systems
FileCatalyst Server has the ability to leverage external file systems (such as cloud storage instances) for file storage. Supported file systems include:
- Amazon S3
- Azure Blob
- OpenStack Swift
- Google Cloud Storage
- Backblaze B2
- Wasabi
- Dropbox (Labs)
- SMB / CIFS
- Encrypted
Note: File Systems marked with the "Labs" tag are still under development, and while generally functional, issues may be encountered in their use. Labs features and products are made available for prototyping and public feedback, but are not recommended for production use, and may be subject to changes in both content and function before general release.
This feature is described in a separate document: FileCatalyst Server: External File Systems.
Monitor Panel
This panel contains tools for viewing transactions and usage on the FileCatalyst Server. Currently there are two sub-section tabs available: Sessions Table and Bandwidth Usage Graph
Sessions Table
This table shows an overview of any sessions that are currently active on the FileCatalyst Server:

Visible columns are as follows:
- Username: The unique name of the user associated with the session.
- IP: The IP of the transfer client (eg. FileCatalyst HotFolder)
- File: The actual name of the file currently being transferred. (In some cases, temp names are used; this column will show temp names rather than the original file name).
- Status: The status of the current session (Idle, cancelling, etc) or in the case of in-progress transfers, the percentage, direction, and mode as a single string (eg. "87% - Receiving (UDP)")
Session Activity View
Select a session on the session table and select “Activity” from the row's tool menu. This will open the "Activity" view in a new tab or window.
Note: Your browser may block these kinds of “popups”; if pressing the button does not show a new tab, please check you browser settings and pop-up blocker add-ons.

Session Clients Table
This table contains current information about each client of the selected session. It will show the session identification on the title. If the transfer is not in progress the table will be in an idle state. During transfer, it shows:
- Client ID (sessions can have multiple clients or a “Master” client)
- Elapsed Time
- Filename
- Status (either a progress in terms of percent, or a description of current activity such as "Calculating MD5")
- Current RTT (latency)
- Bytes Transferred
- File ETA (estimated time of arrival)
- Packet Loss (current)
- Transfer Rate (current)
Note: If you are seeing a session with multiple clients the Show Overall Graphs and Logs will appear. When it is clicked the overall information for the session is displayed.
Graph, Visualization and Logs Section
Select an appropriate tab in order to change the information displayed below. “Visualization” is only available for single transfer threads. In other words, it is considered always-on for single-client transfers; for multi-client, an individual client must be selected from the “Clients” table above.
“Graph” contains a line graph of effective and current transfer rate (in kbps):

“Visualization” is bundle of information representing resource usage for Source and Destination:

“Logs” shows the current logs for the task. Logs can be filtered by using the search form at the top of this container:

- Search: Clicking Search will open a new tab that displays the current log filtered for the provided keyword. You can match case should you wish.
- Scroll Lock: Enabling Scroll Lock will prevent the screen from scrolling to the latest text added to the text area.
- Retrieve: will retrieve a user provided number of lines from the logs available on the server.
- Copy to Clipboard: copies the text from the current log window to the clipboard.
- Clear: clears all of the text in the current text area.
Bandwidth Usage Graph
This graph provides a virtually real-time view of incoming and outgoing data to and from the FileCatalyst Server.
A legend describes the X and Y axes, as well as the direction of the data flow.

Log Viewer

The log viewer is a screen that holds log information, and is available from the secondary menu found it the right of the header bar. It contains 5 elements:
- Log Container: main area containing the log text.
- Lines: Allows the user to specify the number of lines to retrieve with each request.
- Refresh logs: a button to request the logs immediately (otherwise, logs are updated automatically every 5 seconds)
- Retrieve All Available: Will request up to 10,000 lines of logs at once.
- Pause/Resume UI: a button to pause/resume the logs updates on the UI. Note: logging will continue within the FileCatalyst Server itself, but the web UI will not receive updates while paused.
Performance Tuning
The FileCatalyst Performance Tuning documentation can be found here
Support
Support System
Visit our support website at https://support.filecatalyst.com to view the knowledge base and to submit a ticket (Available 24/7).
If you have already submitted a Ticket and would like to send us your case files please go to https://support2u.filecatalyst.com to upload them. A valid Ticket ID will be required.
Support Information
For support contact information, support hours and live chat: Visit our website at https://support.filecatalyst.com